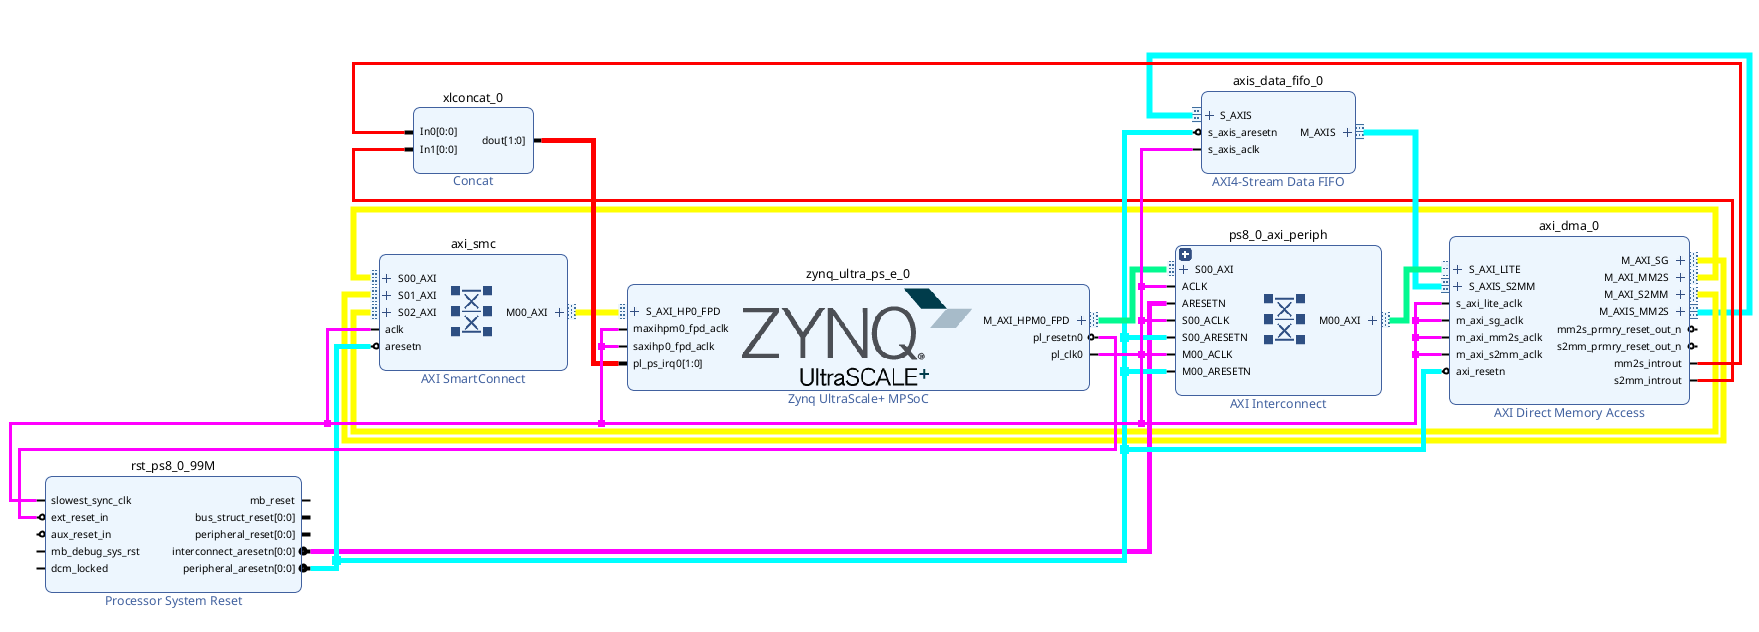
In this post, we will walk through the bring-up and testing of the AXIDMA using vitis bare-metal examples and the petalinux axidmatest driver. The hardware configuration for this demonstration is based on the setup described at fpgadeveloper.com, you can also refer the youtube video; however, I have provided the full .tcl script for the vivado project to simplify the setup.
This project was developed using vivado 2022.2. To ensure compatibility, you must use the corresponding versions of petalinux and vitis.
1
2
3
4
5
6
7
8
# Open Vivado and use tcl console# Navigate to home directory and verify pathcd[file normalize ~]
puts "Current working directory: [pwd]"# Create and navigate to the working directory
file mkdir"[file normalize ~]/axidma-vivado"cd"[file normalize ~]/axidma-vivado"
Downlaod this .tcl script axi-dma.tcl and save it inside ~/axidma-vivado.
1
2
3
4
5
6
# make sure to save the downloaded tcl script inside this folder ~/axidma-vivado# source the .tcl file in vivado tcl console# this also automatically opens the project folder ~/axidma-vivado/axi-dmasource"[file normalize ~]/axidma-vivado/axi-dma.tcl"# Open the block design
open_bd_design "[file normalize ~]/axidma-vivado/axi-dma/axi-dma.srcs/sources_1/bd/design_1/design_1.bd"
We need few pre-requisites for petalinux build to test the axidma, which includes downloading the offline files of petalinux downloads, sstate-cache for aarch64 and petalinux toolchain. Follow the steps explained in petalinux-starter-guide.
1
2
3
4
5
6
7
8
9
10
11
12
# open ubuntu bash terminalcd$HOME# Source petalinux tool chainsource$HOME/petalinux_downloads_sstate_shared/tools/petalinux/2022.2/settings.sh
# create zcu102 petalinux project
petalinux-create -t project --template zynqMP -n zcu102_axi_dma
cd zcu102_axi_dma
petalinux-config --get-hw-description=$HOME/axidma-vivado/axi-dma/design_1_wrapper.xsa
# this opens a blue menuconfig window and change the following config variables
Configuration Option
Value
Description / Purpose
CONFIG_SUBSYSTEM_BOOTARGS_AUTO
y
Automatically generates kernel boot arguments
CONFIG_SUBSYSTEM_BOOTARGS_EARLYPRINTK
y
Enables early printk in boot arguments
CONFIG_SUBSYSTEM_EXTRA_BOOTARGS
cma=1024M
Appends custom extra arguments (e.g., CMA memory allocation)
Forces offline BitBake builds without internet access
**
After setting above configs, CONFIG_SUBSYSTEM_USER_CMDLINE will contain final kernel bootargs, which will look like earlycon console=ttyPS0,115200 clk_ignore_unused root=/dev/sda1 rw rootwait cma=1024M
Kernel Configs
1
2
# set the kernel configuration options using
petalinux-config -c kernel
Kernel Configuration Option
Value
Description / Purpose
CONFIG_DMATEST
m
Enables the generic DMA test client as a loadable module
CONFIG_XILINX_ZYNQMP_DMA
y
Enables the Xilinx ZynqMP DMA driver
CONFIG_XILINX_DMATEST
m
Enables the Xilinx DMA test client as a loadable module
CONFIG_XILINX_VDMATEST
m
Enables the Xilinx Video DMA test client as a loadable module
CONFIG_CMA_SIZE_MBYTES
1024
Sets the Contiguous Memory Allocator (CMA) size to 1024 MB
CONFIG_XILINX_DMA
y
Enables the core Xilinx DMA engine driver
CONFIG_ARM64_4K_PAGES
4KB
Configures the ARM64 kernel page size to 4KB
CONFIG_CMA
y
Enables the Contiguous Memory Allocator subsystem
CONFIG_PARTITION_ADVANCED
y
Enables advanced partition table types support
CONFIG_EFI_PARTITION
y
Enables GPT (EFI) partition table support
CONFIG_USB_DWC3
y
Enables DesignWare USB3 DRD controller driver
CONFIG_USB_DWC3_DUAL_ROLE
y
Sets USB DWC3 controller to dual-role (Host/Device) mode
CONFIG_USB_SUPPORT
y
Enables core USB support in the kernel
CONFIG_USB_COMMON
y
Enables common USB framework files
CONFIG_USB_ARCH_HAS_HCD
y
Indicates architecture has USB Host Controller Driver support
CONFIG_USB
y
Enables support for USB
CONFIG_USB_XHCI_HCD
y
Enables xHCI USB controller support (USB 3.0)
CONFIG_USB_XHCI_PLATFORM
y
Enables generic platform xHCI controller driver
Rootfs Configs
1
2
# set the rootfs configuration options
petalinux-config -c rootfs
RootFS Configuration Option / Recipe
Value
Description / Purpose
CONFIG_libmali-xlnx
y
Enables the Xilinx Mali GPU user-space library
CONFIG_mali-backend-wayland
y
Configures the Mali graphics backend for Wayland
CONFIG_packagegroup-petalinux-weston
y
Includes the PetaLinux Weston (Wayland compositor) package group
CONFIG_axidma-driver
y
Enables the custom AXI DMA driver recipe in the rootfs
CONFIG_auto-login
y
Enables automatic console login for the root user
Device tree Overlay
1
2
3
# Build the device tree yocto task to updat the DTSI files# This will get us system-user.dtsi and pl.dtsi
petalinux-build -c device-tree
Using this command the DMA IP block parameters are succesfully translated to devicetree node, it captures the memory mapped address, scatter gather settings, buffer length, read and write channel properties.
/* the same overlay will be used by both kernel and uboot
* file: project-spec/meta-user/recipes-bsp/device-tree/files/system-user.dtsi
*//include/"system-conf.dtsi"/{// this node is needed to test axidma using axidmatest kernel moduledmatest_0:dmatest@0{compatible="xlnx,axi-dma-test-1.00.a";dmas=<&axi_dma_00&axi_dma_01>;dma-names="axidma0","axidma1";};};/* Override the second channel's device-id to 1 so they are unique */&axi_dma_0{dma-channel@a0000030{xlnx,device-id=<0x1>;};};// usb enable&usb0{status="okay";};// usb as host mode to boot from flash drive&dwc3_0{status="okay";dr_mode="host";};
Once you are in u-boot hush shell, will boot kernel from usb flash drive manually
1
2
3
4
5
ext4ls usb 0:1 /boot/
ext4load usb 0:1 0x00200000 /boot/Image
ext4load usb 0:1 0x00100000 /boot/system.dtb
setenv bootargs "console=ttyPS0,115200 root=/dev/sda1 rw rootwait cma=1024M"
booti 0x00200000 - 0x00100000
Once booted will probe the axidmatest kernel module to verify the vivado hardware loopback design.
1
2
3
4
5
6
7
8
9
modprobe axidmatest
# will get following kernel logs which proves the successful integration of DMA and AXIS Data FIFO in loopback# [ 207.251636] dmatest: Started 1 threads using dma0chan0 dma0chan1# [ 207.273131] dma0chan0-dma0c: terminating after 5 tests, 0 failures 2162 iops 182958 KB/s (status 0)# you can also try multiple iterations also
modprobe axidmatest iterations=100